| Ted Yao |
Blog(posted on 30 Aug 2014)
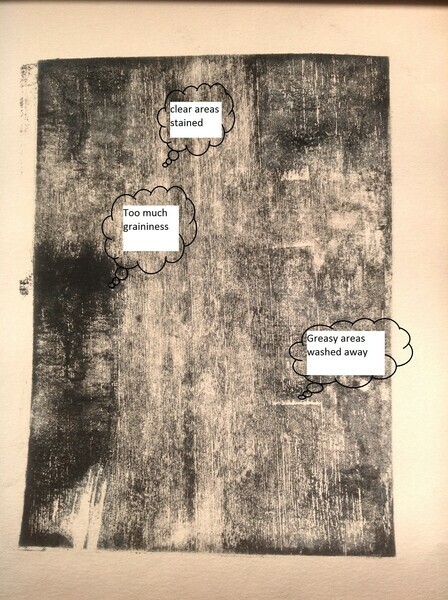
The point of printmaking is to reproduce the image reasonably reliably. Here is where mokulito fell down, at least for me. While the plate could be reused, each successive impression became "scummy", as soon as the second impression. Here is the second printing from the freshly made plate for After Crucifixion:
Pretty discouraging, huh? The ink is going where it shouldn’t and not going where it should. These are two different problems. The first is caused by a breakdown in the non-greasy ("white") areas, which don’t repel the ink the way they should. The second is a failure of the greasy area ("black") to accept the ink, and can be caused by poor technique right from the beginning. In After Crucifixion 1 I know it was caused by scrubbing too hard on the greasy areas and perhaps poor adhesion of the oil pastel crayon to the wood. (Remember I transferred this using a transfer technique of scumbling with crayon on fabric and then ironing the pattern on wood with a cool iron.) Therefore, here are Ted Yao’s two principles of non-scummy Mokulito:
As artists, we think of the image as optical, not chemical. Mokulito is a little like writing with invisible ink; what we want to do is produce a sustainable, greasy surface and equally, protect the non-greasy surface from being contaminated by ink. Thus, a litho crayon or oil pastel such as I used on the first go produces a lovely scribble line, but must be very gently washed, lest the pastel be washed away. I had better results when I washed with the tips of my fingers, under a stream of water and not scrubbing with the sponge. Incidentally I am using a terrific close pored sponge which is made right here in Glengarry County, Ontario and which I will describe in a future blog.
With respect to the damp surface principle, I found that each time you print an image, the dry paper wicks away the water, so the non-greasy surface is no longer damp. Thus, your first order of business after printing is to flood the surface of the plate with water, before inking again. Ink sparingly, I found two or three passes are best to avoid inking the clear areas. As you ink, inspect the surface carefully to make sure the ink is getting to all the greasy parts, just as you would do for an etching. Whether you have enought ink is hard to see when the surface is wet and shiny. When quitting for the day, apply gum Arabic immediately, before your cleanup. This helps prevent any application of gum Arabic to greasy areas, so that your plate will "remember" the image.
Finally a couple more tips: I used a hardware store paint roller not a brayer. Sponge not velour. The reason I think that this works better is that the roller being a sponge will automatically take away excess water thus allowing the inky parts of the same roller to release ink onto the greasy parts. I found that a sanded surface (as opposed to a scraped or planed surface) is rougher and helps your crayon (or other marker) adhere. A word to the frugal, ink tends to seep into the wood, making the whole surface greasy over time, so this is why plates can’t be cleaned and reused.
Using these principles, here is After Crucifixion 3:
|

Copyright © 2025, Ted Yao. All rights reserved. | Administration
| Powered by ArtSites.ca.